I've been to a few potluck dinners and I usually fix something up in one of my casserole dishes, wrap it in a towel and hope it stays warm. With a potluck coming up tomorrow evening I decided to stitch up this carrier. This fits a 1.5 quart casserole. I made it as I went but will try to get a pattern posted :)
About Me

- Samatha
- I've been a crafter for as long as I can remember. I think even when I was very young and watching my mother sew and crochet, I was storing information for future use. I've recently been diagnosed with Osteoarthritis, but despite that, I'm going to be a crafter forever.
Wednesday, January 19, 2011
Tuesday, January 18, 2011
The Gingham Throw
Here;s a pic of the gingham throw that I am working on now. I've already decided to make a matching pillow with smaller squares. This will keep me busy for a few days. If you would like to see the pattern, I've asked the owner to share the link. Thank You Michele! Gingham Ghan
Monday, January 17, 2011
The Finished Shawl
I would have gotten this finished a few days ago but I ran out of the Turqua colored yarn. I'm proud of the way it turned out. Now I'm on my way to my last day of physical therapy. And then back home to work on a gingham throw that I absolutely love.
Sunday, January 9, 2011
Upcycled Glass, How I do it.
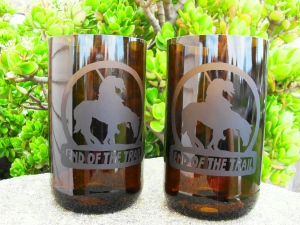
Upcycled basically means taking something that you would normally throw away and make something new and wonderful out it. Like gum wrappers made into a purse or, in this case, bottles into drinking glasses.
There are a lot of instructions/videos on the web that show various methods. Some work and some don’t. There is one video that shows that you can just wrap a string soaked in lighter fluid around the bottle, light it, dunk it in water and wallah you have a glass. If it was that simple it would make my life much easier, lol.
Here’s my method. And I will go ahead and tell you that it is very time consuming process and if your not used to working with glass or scared of breakage, don’t try this at home.
What you will need to get started: glass cutter for scoring,candle, sink full of cold water, flat piece of glass (I use a mirror), fine grinding powder, sandpaper, plenty of bottles and lots of patience.
The first step is to score the glass with a glass cutter. You only want to score it, not cutting into the glass to deep or the glass will crack for sure.
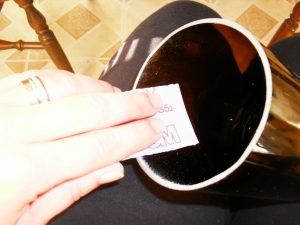
Once the glass is scored it is the heating and cooling of the glass that breaks it. So with a candle, heat the glass at the score line by holding and glass just above the flame while continuously turning the bottle. If the flame is too big or your holding the glass to close, it will create a black smoke and you need to make adjustment. It doesn’t take long about 30 seconds for small bottles but up to a minute for thicker glass such as wine bottles.
Holding the glass firmly on the top and bottom, submerge it quickly in cold water. Do not pull. If the glass is ready to break, it will break on it’s own. If it doesn’t break the first time you can reheat slightly and submerge it again. ( I didn’t get a picture of submerged glass as I had to use both hands)
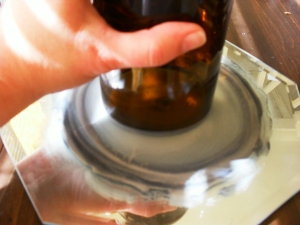
I would not recommend drinking out of the glass at this point as it is slightly sharp and jagged. You have to smooth the edge by rubbing on a flat piece of glass with a fine grinding powder and water.
You rub the rim of the glass in a circular motion until the rim is smooth and and there are no shiny spots. This is very noisy so I would recommend keeping a pair of earplugs handy. This part of the process can be very time consuming depending on the thickness of the glass. When you get close to it becoming smooth you will hear it become slightly quieter. Keep grinding.
Once the rim is smooth, you will need to smooth the edges at a slight angle. I use a very fine sandpaper for this. Something like 320 grit or emery cloth.
Make sure to sand both inside and outside of glass. Being very careful not to get a nick on your finger. I must say from experience it’s very similar to a good paper cut.
Now you should have a nice smooth drinking glass.
I think I’ll save the “Etching” process for another day. Enjoy!
My First Shawl
I’m always working on several projects at once so it was really hard to decide which one to start with. I don’t know why but the other day I got the urge to make a shawl. Maybe because I like the feeling of the past. It has always inspired me as an artist. For my first shawl I thought I would find a simple pattern. After doing some research I found the word “simple” just does not exist. However I did find a pattern that I thought I could handle. It’s a Wrap . Leave it to me to not read all the directions before I began. However, I was surprised by the pattern and surprised myself by doing some stitches that I have never done before. It’s not complete yet but I couldn’t help but share this photo of the variations in this pattern.
Hello World!
Welcome to my blog. I’ve decided to start sharing some of my work and how it is made. Some of the thoughts and processes that go into my work and sometimes disappointment, lol. It will be a journey for me. I hope you will enjoy it.
Subscribe to:
Comments (Atom)


